NOTE: (2016/10/20) We have changed the link for VPN software to use the direct links to Tunnelblick (Mac) and OpenVPN (Windows) software. If you use Android or iOS, you should download the OpenVPN Connect from your appropriate mobile app store. This change will affect the installation procedure somewhat, but the following instructions should still be read through (first) to get an understanding of what generally should happen during an install.
To use OpenVPN, you must have received a configuration file from Dark Wire VPN or from your company’s IT Department if your company has a group account with Dark Wire VPN. Keep this file available for use later on in the installation process.
Download Tunnelblick, the OpenVPN Mac client from here: Click to download DarkWireVPN for MacOSX.dmg
Locate the file in your Downloads folder and double-click it. After the Tunnelblick disk image opens, you will be prompted to double-click the Tunnelblick install application.

NOTE: If you are running OS 10.9 or higher (Yosemite, Mavericks or NEWER), double-clicking the icon may NOT begin the application install. It may display a window that says the application cannot be run. If that occurs, simply right-click on the icon and select “Open” from the menu.
NOTE 2: If you are running OS 10.9 or higher, you should read the page on installing the FIX for Yosemite, Mavericks or NEWER at this support page.
NOTE 3: For Yosemite, Mavericks or NEWER users, once you Open the application to begin the installation, you MAY see another popup like this one:
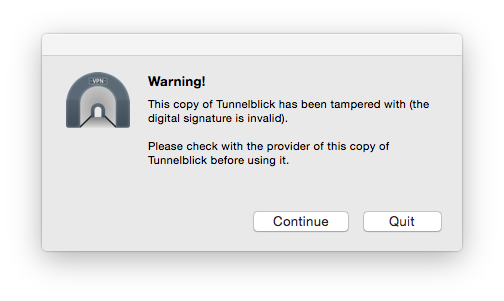
You may safely hit Continue. We are currently in the process of building a new version of our customized binary for OS 10.9.x and higher. But until that process is completed, you should use the one we have available for download.
If you see a standard warning like the one below, click Open.

Agree to let Tunnelblick be installed on your local hard disk.

After installation, tell it to Launch Tunnelblick.

Click “Open” if the warning screen appears.

After Tunnelblick starts, it will place itself in the top right status bar (it looks like a black doorway) next to the Spotlight magnifying glass.
![]()
It will also open a Welcome screen which states that there are no configurations installed. Click “I have configuration files.”
INSTALLING YOUR FIRST CONFIGURATION

When it asks which type you have, select OpenVPN Configuration(s).

At this point, Tunnelblick will open a new Folder on the Desktop with the name “Empty Tunnelblick VPN Configuration.”
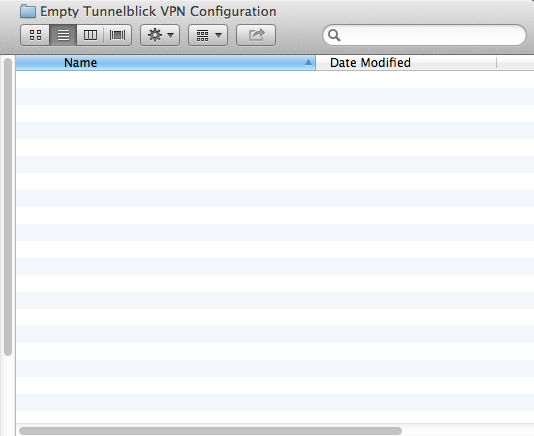
It will also pop open a window of instructions which detail how to create your configuration. Follow these instructions. Sample screenshots are provided below:
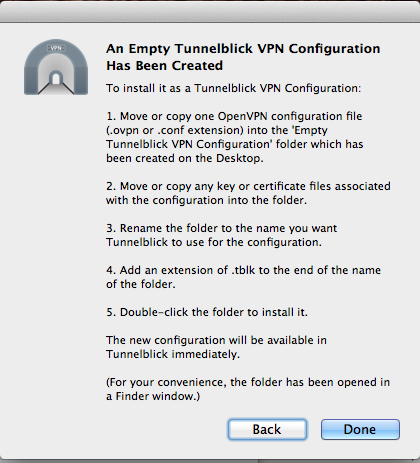
You should have received your configuration files in an e-mail. Save those configurations. Usually they are placed in the Downloads folder. Locate your OpenVPN configuration file in another Finder window, and then drag it to the open Finder window for the Empty Tunnelblick VPN Configuration Folder. NOTE: DO NOT put more than one configuration file in the Empty Tunnelblick VPN Configuration Folder. If you do, it will not work.

Go to your Desktop in the Finder. You can sort by date to see the new folder at the top of the list, or you can locate it by name if you have your Finder sorted alphabetically.

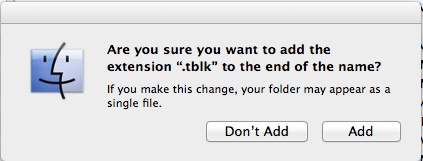
Click on the folder name to highlight it, and then click one in the actual name to bring up an edit box to change the name to whatever you prefer. We recommend that you put the name of the COUNTRY for each VPN configuration so you can easily choose which VPN connection you want later on. Be sure to add a .tblk extension to the end of the folder name. This is required.


The Finder will ask if you are sure you want to add .tblk to the end of the folder. Click the “Add” button to confirm.
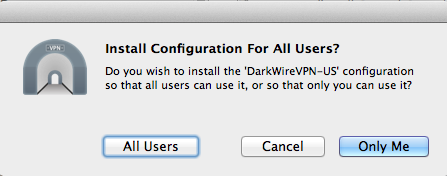
Double click the folder name to install it. It will ask if you wish to install for all users or just yourself. This is a preference choice, but installing it for all users will allow other login names on the Mac to use the VPN (recommended).
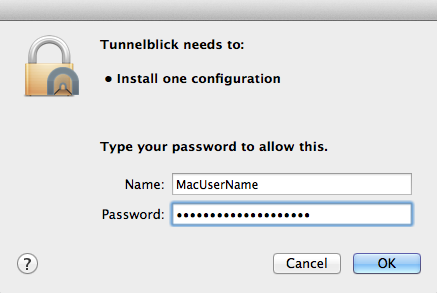
Then enter your Mac username and password to allow it to set the configuration on the computer.
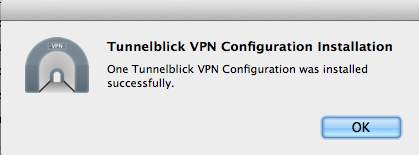
Tunnelblick will report the successful installation.
Click the Tunnelblick icon in the top right status bar
. 
Select your configuration file name in the list.

THE NEW TWO STEPS MAY ALSO BE REQUIRED:
Allow Tunnelblick to repair the permissions on the file by typing in your password for your Mac username.

When it prompts you about the ‘down-root’ plugin, select “Always use the plugin.”

CONNECTING:
At this point, you should typically see a screen pop up. In the top right, you should see the Tunnelblick status window saying “Connecting.”

You will see the following screens as it finishes making a successful connection.


Afterwards, the status bar should have a green indicator in the Tunnelblick icon.
![]()
(If you receive any errors, of the connection is not successful, ensure that you have followed each of these steps correctly. Document what you have done, any differences from these instructions, and then contact our support department.)
Verify Your VPN Connection
At this point, you may use the Internet with your new VPN connection. Should you wish to verify that you are using the VPN for web traffic, you can use the Support page entitled “Show My IP.” (Or you can visit any of the sites which show you your public IP address. One such site is http://www.whatismyip.com/.) You should load the page with the VPN disconnected and then try reloading the page after connecting with the VPN to compare the differences.
To disconnect, click the Tunnelblick icon in the status bar and choose Disconnect on your configuration.

NOTE: Some Mac users have experienced a problem using their local Internet access on wireless connections. After disconnecting from the VPN, if you cannot browse the Internet, simply click the wireless icon in the status bar, choose “Turn Airport Off.” Then click it again and choose “Turn Airport On.” You should then be able to use your local Internet access again.

In a Finder window, click the Eject button beside the Tunnelblick disk image to eject the disk image.
![]()
You may also delete the Tunnelblick folder off the Desktop once the configuration has been installed.
ADDING ADDITIONAL CONFIGURATIONS
To add additional configurations for other DarkWire nodes, click the Tunnelblick icon, click on VPN Details and then click the plus symbol (+) in the lower left of the window. Follow the instructions from your the section INSTALLING YOUR FIRST CONFIGURATION.